Attack from Mars
Mini-Saucer Expansion KitTM
How to Install the AFM Mini-Saucer Expansion Kit
Chapter 4: Installation testing and jumper settings
(Click on pictures to enlarge)
|
You should be able to power on at this point. For a quick test of the kit, you can use the jumper settings. The J20 jumper header is the 16-pin dual-row connector, located just to the left of the U1 main chip.
Section 2: Configuration Jumper Settings Test Jumper Settings
Jumper #2: Super Jets Test Mode Jumper #1 & 2: Input Test Mode 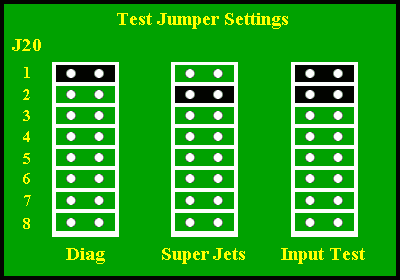
Set a jumper horizontally, connecting the top two pins from the first row of the header. This test cycles through the backbox GI, the Jet Bumper GI, the "Super Jets" Flasher, the Attack Hallway LEDs and the AFM-LED mini-saucer enable/disable signal. The entire test takes about two minutes to run a full cycle. Remove the jumper(s) at anytime to end the diagnostics routine(s). For proper testing, please be sure the coin door is closed or the "Super Jets" flasher will not activate. Super Jets Test Mode Set a jumper horizontally, connecting the two pins from the second row of the J20 header. This turns on the "Super Jets" feature all the time. The Jet Bumper GI will run the cycling animation, and any jet bumper hit will trigger the flasher. You can use this mode to verify that each bumper properly triggers the flasher. If not, you may need to re-orient the sensor below the Jet Bumper Coil Assembly. Signal Input Test Mode Set Jumpers #1 and #2 to enter the Signal Input Test Mode. The LEDs on the left wall of the Attack Hallway will show you the status of the input signals being fed into the AFM Expansion board. The LED closest to the flippers is LED #1.
LED #2: Jet Bumper hit detected LED #3: Super Jets flasher detected LED #4: Strobe Light detected LED #5: Mothership LED Data detected LED #6: Mothership LED Clock detected (not used) Testing Additional Functions The "Attack Hallway" LEDs can be further tested during Attract Mode. These LEDs will run any time the Mothership LEDs are running and the Yellow GI is on. They may also run during Strobe Multiball, depending on the system jumper settings (see below). The AFM-LED mini-saucer enable/disable feature turns off the mini-saucer LEDs from the original kit during Video Mode and Strobe Multiball. You can test this feature by going into the GI test, and making sure the Yellow GI string is off. Note that "dim" is not OFF. When the Yellow string is off and the Mothership LEDs are inactive, the mini-saucer LEDs should turn off. The status of the AFM-LED mini-saucer enable/disable feature can be checked at any time via the LEDs on the AFM Expansion board. If the LED #3 is on, the mini-saucer LEDs should also be on. If LED #3 is off, then the mini-saucer LEDs should all be dark. Configuration Jumper Settings
Jumper #4: Disable the Hallway LEDs during Strobe Multiball Jumper #5: Super Jets Animation Setting (0 = Chase, 1 = Blink) Jumper #6: Hallway LED Animation Select (0 = Auto, 1 = Select) Jumper #7: Hallway LED Animation (Bit 0) Jumper #8: Hallway LED Animation (Bit 1) If Jumper #6 is not set, the Attack Hallway LED patterns are randomized. If Jumper #6 is set, then the Attack Hallway LED pattern will follow the settings for Jumpers 7 & 8:
Jumpers 7 & 8: 01 -- Pattern 2 Jumpers 7 & 8: 10 -- Pattern 3 Jumpers 7 & 8: 11 -- Pattern 4 
Chapter 1: Preparing your game Chapter 2: Installing the board and connecting the cables Chapter 3: Wiring up the Super Jets and Attack Hallway LEDs Chapter 4: Installation testing and jumper settings Chapter 5: Troubleshooting |
Back to the Main Page
Copyright © 2010 UFO PinballTM
www.ufopinball.com