Attack from Mars (Remake)
Mini-Saucer and Expansion KitTM
Chapter 8: Testing and jumper settings
(Click on pictures to enlarge)

Jumper #2: Super Jets Test Mode Jumper #1 & 2: Input Test Mode 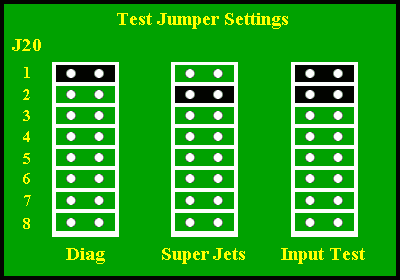
Note: The AFMr Kit does not have a #8 position.
Diagnostics Mode
LED #2: Jet Bumper hit detected LED #3: Super Jets flasher detected LED #4: Strobe Light detected LED #5: Mothership LED Data (Blue) LED #6: Mothership LED Data (Green) LED #7: Mothership LED Data (Red) LED #8: (not used)
Note: This may be easier to view if you lower the target bank.
Jumper #4: Strobe MB Hallway LED Enable Jumper #5: Super Jets Animations Setting (0 = Chase, 1 = Blink) Jumper #6: Hallway LED Animation Pattern Select (0 = Auto, 1 = Select) Jumper #7: Hallway LED Pattern Preference (0 = Alternating, 1 = Synchronous)
The most common setting is to enable Jumper #3 only, but you are welcome to customize your kit as you like.
Chapter 1: Tools and preparation Chapter 2: Mounting the board(s) and connecting power Chapter 3: Inserting LEDs in the Mini-Saucers Chapter 4: Installing the mini-saucers back in the game Chapter 5: Setting up the Hallway LEDs Chapter 6: Running wiring harnesses under the playfield Chapter 7: Connecting the Backglass GI Chapter 8: Testing and jumper settings Chapter 9: Troubleshooting |
Back to the Main Page
Copyright © 2021-2022 UFO PinballTM
www.ufopinball.com